Senin, 16 Desember 2013

Cara mudah jailbreak/unlock/upgrade iphone 2G,3G,3Gs/Ipod/ ipad apple

Cara mudah jailbreak/unlock/upgrade iphone 2G,3G,3Gs/Ipod/ ipad apple

BAGAIMANA CARA JAILBREAK / UNLOCK / FORMAT ULANG / UPGRADE
PADA IPOD /IPHONE ATAU IPAD..


SAYA MAU SHARE SEDIKIT TENTANG CARANYA..

JAILBREAK = membuka system kunci pada apple agar bisa di masukkan aplikasi atau game dengan format IPA file tnpa melewati itunes..

UNLOCK = membuka system apple yg di kunci agar bisa di pakai kartu gsm bermacam2 indosat/ m2 / simpati / as /axis / xl / dll

CYDIA = adalah program yg berisi apapun tetang app script anda secara gratis walaupun tidak semua gratis..tp rata2 gratis semua..misal agan mau menambah app / game / dll di apple anda dengan download di cydia .


siapkan ipod / iphone anda


(kondisi phone harus menyala dengan normal, pulsa untuk internet hrus aktif / gunakan wifi )--> untuk online mode
( PAKAI CARA 1 DAN 2 )

(kondisi phone mati total ato nge blank ato hang ato bla bla bla
(PAKAI CARA 3 )redsnow

(kondisi phone normal offline mode
( pake cara 4)

1.LANGKAH LANGKAH JAILBREAK
( iphone 2G / 3G / 3Gs / ipod / IPAD )
online mode


JAILBREAK :

1.buka browser SAFARI di phone agan..

2.buka halaman browser ..masukkan address
" http://jailbreakme.com "

3.nanti agan akan di suruh slide untuk memluai jailbreak ..ikuti aja

4.prosess download berlangsung..jgn putus koneksi internetnya

5.setelah proses download selesai..maka ada tulisan cdya has been added

6.cydia sudah terinstall di apple anda..tandanya apple anda sudah ter JAILBREAK dengan normal

SELAMAT APPLE ANDA SUDAH TER JAIL BREAK


2.LANGKAH LANGKAH UNLOCK KARTU
online mode

UNLOCK:

*matikan / disable 3G mode

1.buka CYDIA app di apple anda.

2. pilih dan tekan " Manage tab " di screen.

3. pilih " Sources "

4. pilih "Edit button " di top right of the screen.

5. Enter the source URL:
" http://repo666.ultrasn0w.com "

6. pilih " add source "

7. pilih " ultrasnow" di CYDIA dan install app tersebut

8. lakukan perintah2 nya...trus REBOOT apple anda...

DONE....selamat apple anda sudah ter UNLOCK


3.LANGKAH LANGKAH UPDATE + INSTALL ULANG apple anda
(termasuk JAILBREAK + UNLOCK )
offline mode

UPDATE FIRMWARE:

1. masuk menu ITUNES..backup dulu data2 di apple.

2..matikan apple anda dalam keadaan blank screen ( shut down ) konek ke PC memakai kabel data

3.download firmware IPOD / IPHONE ? IPAD untuk semua versi disini
" http://www.spiritjb.org/2010/02/down...pad-apple.html "

4.download sekalian REDSNOW sesuai kategory apple anda...
( contoh di bawah ini untuk iphone 2G / 3G / 3Gs redsnow + OS firmware versi 3.0 )

REDSNOW DOWNLOAD windows

REDSNOW DOWNLOAD MAC

DOWNLOAD FIRMWARE V 3.0

5.install applikasi REDSNOW di kompt anda..

6.buka REDSNOW


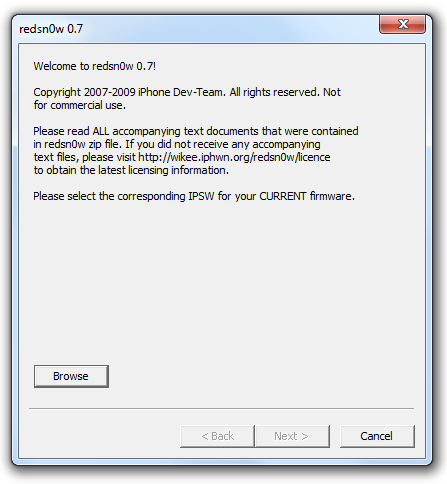
7.pilih firmware yg tadi di DOwnload kalo cocok akan muncul spt ini


8.klik next


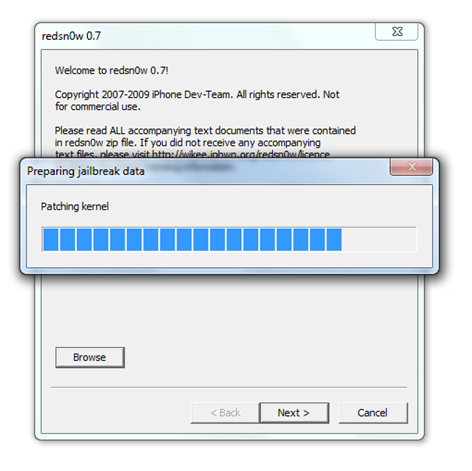
9.pilih / centang jailbreak dan unlock


10.redsnow akan meminta file " bl39.bin " dan " bl46.bin files. " pilih dan lanjut.

bl39.bin
bl46.bin

11.kondisi apple tetep mati / shutdown plih next


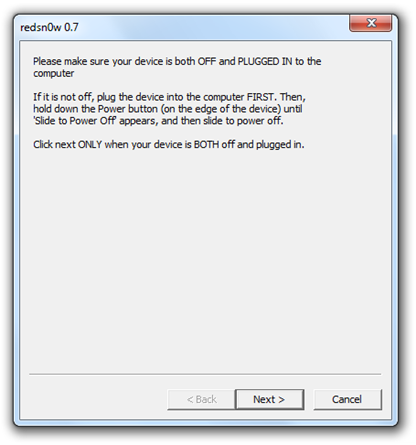
12.OK..anda akan memasuki " DFU MODE " siap2 jangan melset ya hitungannya sepeti yg di perintahkan REDSNOW..
*Hold “Power” button selama 2 detik
**tetap menahan tombol POWER..tekan dan tahan tombol " HOME" selama 10 detik
***kemudian lepaskan tombol POWER ,jari tetap menahan tombol HOME selama 30 detik ..maka anda akan memasuki installation

13.prosess berlangsung dan apple akan reboot sendiri


14.selamat apple anda berhasil


( MSALAH MASALAH PADA WIN 7 )
i) Right Click on Redsnow.exe

ii) Click on Properties

iii )Switch to Compatibility tab on the top.

iv) Check ” Run this program in compatibility mode for: Windows XP ”

v) Start the application by right clicking on redsn0w. exe file and click on run as administrator


4.JAILBREAK DENGAN BLACKRAIN
offine mode
REDSNOW JAILBREAK:

BlackRa1n
RC3
RC2
RC1

IPHONE CONECT VIA KABEL KE CPU...kondisi menyala
1.Klik kanan open with administrator ( win 7)
2.tunggu 1menit


3.apple anda akan restart..
4.DONE..JAILBREAK suksesssss
5.Blackrain tidak menaruh CYDIA secara otomatis..klo pingin mendapatkan CYDIA klik menu blackrain pada apple anda.,pilih CYDIA and download

Cara untuk Jailbreak iPad 2 dengan JailbreakMe

Dibawah ini adalah instruksi bagaimana untuk jailbreak iPad 2 anda di iOS 4.3.3 dengan menggunakan JailbreakMe.

Jika iPad 2 anda sudah menggunakan versi iOS 4.3.3, anda bisa melewati 5 langkah pertama petunjuk dibawah ini.

Langkah Pertama
Buat direktori Pwnage di desktop anda dan tempatkan iOS 4.3.3 ipsw (iPhone Software) di dalamnya.

Anda bisa mengunduh file ipsw tersebut melalui link dibawah ini:
4.3.3 (iPad 1): iPad1,1_4.3.3_8J3_Restore.ipsw
4.3.3 (iPad 2 Wi-Fi): iPad2,1_4.3.3_8J2_Restore.ipsw
4.3.3 (iPad 2 GSM): iPad2,2_4.3.3_8J2_Restore.ipsw
4.3.3 (iPad 2 CDMA): iPad2,3_4.3.3_8J2_Restore.ipsw


Langkah Kedua
Sambungkan iPad anda ke komputer dan jalankan program iTunes.


Langkah Ketiga
Pilih iPad anda dari daftar devices di sebelah kiri layar


Langkah Keempat
Tekan dan tahan tombol keyboard Option (di Mac) atau Shift (di Windows) dan klik tombol Restore di layar iTunes.


Langkah Kelima
Pilih iOS 4.3.3 ipsw dari direktori Pwnage di desktop anda dan klik tombol Open.


Langkah Keenam
Begitu iPad anda sudah menggunakan iOS 4.3.3, pilih ikon Safari atau browser lain di layar iPad anda.


Langkah Ketujuh
Masukkan http://www.jailbreakme.com di kolom navigasi dan tekan tombol Free.


Langkah Kedelapan
Tekan tombol install.


Langkah Kesembilan
Safari akan tertutup secara otomatis dan program Cydia akan terunduh.


Langkah Kesepuluh
Pilih ikon Cydia dan nikmati iPad anda yang sudah di-jailbreak.


***Terima kasih banyak untuk Comex atas kerja kerasnya sehingga bisa menghasilkan jailbreak yang luar biasa!***

Cara Jailbreak iPad dan iPhone dengan Mudah, Cepat dan Gratis!

Cara Jailbreak iPad dan iPhone dengan Mudah, Cepat dan Gratis!

Artikel ini khusus dibuat bagi anda yang sedang mencari cara Jailbreak iPad dan iPhone dengan mudah. Ya..dengan cara ini anda tidak perlu mencari jasa jailbreak yang biasanya memiliki harga jailbreak yang mahal. Disini kita akan memanfaatkan sebuah aplikasi jailbreak yang bisa didapatkan secara gratis.
Bagi anda yang belum tahu apa itu jailbreak, jailbreak adalah proses yang dilakukan untuk menghilangkan batasan Apple terhadap device iOS yang kita miliki. Hal ini membuat kita bisa “lolos” dari batasan-batasan yang telah ditentukan Apple.

Fungsi Jailbreak lainnya antara lain :
1. Meloloskan kita dari batasan fitur yang telah ditentukan Apple dan App Store.
2. Bisa menginstall berbagai aplikasi iOS dengan bebas, bahkan aplikasi yang tidak bisa kita install dengan iOS standard.
3. Bisa memodifikasi aplikasi sesuai dengan keinginan pengguna.
4. Membuat device bisa digunakan dengan semua networks. Ini hampir sama dengan melakukan Unlock agar terlepas dari lock carrier network.
5. Beberapa aplikasi di block oleh Apple, misalnya saja aplikasi tertentu tidak bisa diinstall oleh pengguna di luar US. Dengan jailbreak, kita bisa menginstall aplikasi dengan bebas tanpa harus terhalang block atau mengikuti censorship tersebut.
Oke, sekarang anda sudah tahu arti dari jailbreak. Kini langsung saja saya jelaskan cara jailbreak iPad dan iPhone menggunakan aplikasi Absinthe! Akan saya jelaskan caranya satu per satu, mulai dari cara jailbreak iPhone menggunakan Windows, cara jailbreak iPad menggunakan Windows, hingga cara Jailbreak iPad dan iPhone menggunakan Mac OS. Pastikan anda membackup dulu iOS device nya sebelum melakukan jailbreak.
Oke..Siap?? Yuk kita mulai!
A. Cara jailbreak iPhone menggunakan Absinthe di komputer Windows.
1. Download Absinthe terbaru (Absinthe 2.0)
2. Ekstrak file Absinthe yang baru saja anda download

3. Double klik absinthe-win-win-2.0.exe

4. Sebuah folder absinthe-win-2.0 akan tercipta

5. Buka folder tersebut dan klik absinthe.exe

6. Sesuai instruksi yang muncul, hubungkan iPhone anda dengan komputer via USB. Pastikan anda menghilangkan passcode atau setting VPN jika ada.

7. Klik tombol Jailbreak

8. Proses jailbreak akan dimulai. Proses ini meliputi beberapa step antara lain beginning jailbreak, sending initial jailbreak data, sending final jailbreak data, waiting for reboot, dan waiting for process to complete.

9. Proses jailbreak telah selesai.

10. Beberapa saat kemudian, iPhone anda akan tampil dengan Cydia!

B. Cara Jailbreak iPad menggunakan Absinthe di komputer Windows
Untuk melakukan jailbreak pada iPad, caranya sama persis dengan melakukan jailbreak pada iPhone. Jadi langsung saja ikuti panduan jailbreak iPhone diatas ya :)
C. Cara Jailbreak iPhone menggunakan Absinthe di Mac OS
1. Download Absinthe terbaru
2. Double klik file dmg yang sudah terdownload kemudian drag Absinthe ke dekstop anda

3. Double klik untuk membuka Absinthe dari desktop anda

4. Sesuai notifikasi yang ada, hubungkan iPhone dengan Mac anda melalui USB. Pastikan anda menghilangkan passcode atau setting VPN jika ada

5. Klik jailbreak untuk memulai proses jailbreak

6. Proses jailbreak akan dimulai. Ada beberapa rangkaian proses yang akan terjadi, meliputi : beginning jailbreak, sending initial jailbreak data, sending final jailbreak data, waiting for reboot, dan waiting for process to complete

7. Proses jailbreak telah selesai

8. Beberapa saat kemudian, iPhone anda akan tampil dengan Cydia!

D. Cara Jailbreak iPad menggunakan Absinthe di Mac OS
Cara jailbreak iPad di Mac OS sama persis dengan cara jailbreak iPhone di Mac OS. Jadi anda cukup mengikuti cara yang sudah saya jabarkan diatas :)
Mudah sekali khan?
Sekarang anda sudah bisa menjailbreak iPhone atau iPad anda sendiri. Mudah, cepat dan yang pasti.. gratis!
Jangan lupa Like, Tweet atau Plus One artikel ini jika bermanfaat bagi anda. Terima kasih banyak

Sabtu, 14 Desember 2013

How to restore Windows Vista / 7 / 2008 using the Symantec Recovery Disk (SRD) and Restore Anyware (RAO)

Environment


When Windows Vista/7/2008/2012 is installed onto a blank hard drive, Windows typically creates the operating system partition and a small hidden partition labelled either System Reserved Partition (non-EFI system) or EFI System Partition (EFI-enabled system). Each contains vital boot information that SSR needs to restore for the system to boot properly. Note: If a System Reserved Partition does not exists on a non-EFI system, windows likely put the boot files onto an existing partition, such as the operating system partition.
Open Disk Management (click start, type diskmgmt.msc in the search box, and hit enter) to determine which is on your system. Below are a system reserved partition, a, EFI partition, and a system with neither partition.


SSR will detect either of these partition and prompt you to include it in the backup job. Always choose to include it in the backup job.

Solution


To prepare the system for restoration:

  1. Boot the system from the Symantec Recovery Disk (SRD).
       Note: Steps 1-9 will remove all data on the target disk in order to prepare it for the restore.
  2. From the SRD, select the Analyze tab


  1. Select Open Command Shell Window.
  2. At the command prompt, type Diskpart
  3. Type List Disk, then press Enter. This will display all available disks in the system. For this technote, we will be using Disk 0 as an example. (Note: if a disk is not listed, the disk controller driver may not be loaded. If this is the case, go back to the main menu and use the load driver option to load drivers. Drivers must be 32-bit Vista or Windows 2008 in the SRD for BESR 2010 and SSR 2011).


  1. Type Select Disk #, and press Enter. (replace # with the disk number you are restoring to.) The message Disk # is now the selected disk will display
  2. Type Clean, and press Enter. Any and all partition or volume formatting is erased from the disk. A blinking cursor will appear until the message DiskPart succeeded in cleaning the disk will display.
  3. Type Exit, and press Enter.
  4. Exit out of the SRD to reboot the system. The disk is now ready for BESR / SSR to restore the image file(s) to. Please select the restore option below to begin this process:


Restoring a Windows 7 / 8 / 2008 / 2012 system:


Restoring a system will comprise of two steps: First, restore the System Reserved or EFI partition. Second, the Operating System partition.

To restore the System Reserved or EFI partition:
 1.  From the Welcome screen, select the Recover tab to launch the Recover My Computer wizard.


2.  Select the Recovery Point type System
3.  Browse to and select the .sv2i file and click Open.
4.  Click Next.


5.  The Symantec Recovery Disk will detect the un-initialized disk.  Select the drive and click OK to initialize the disk.


6.  Click Yes to proceed with the initialization of the disk.


7.  Once initialization has completed, the Drives to Recover page will appear. (if the Edit Target Drives and Options box appears, click cancel to get back to the Drives to Recover).
8.  Select the System Reserved partition (typically 100 mb). Do not select any other partitions.

**If a System Reserved partition does not exist in the list, select the operating system partition to recover.


9.  Click Edit.
10.  Choose the following options:
- Set Drive Active
-
Restore Master Boot Record


11.  Click OK to return to the previous screen.
12.  If restoring the System Reserved partition, Use Restore Anyware should not checked. If restoring the Operating System partition, Use Restore Anyware should be checked. The option Verify recovery point before recovery checks the image file before the restore. This is optional and should be used if you suspect image file corruption. This addition check will increase the total restore time.
13.  Click Next.
14.  If restoring the System Reserved partition, ensure Reboot when Finished is not selected. Check the details on the screen.


15.  Click Finish to begin the restore.  When prompted, select Yes to start the recovery.
16.  Click Close when the recovery is complete and the SRD Main Menu will appear. At this point proceed with restoring additional partitions.

Proceed with the following steps to restore Operating System and additional partitions:
1.  Click the Recover tab and select Recover My Computer.


2.  Select the Recovery Point type Filename.
3.  Browse to and select the .v2i file.
4.  The Drives to Recover page will appear.
5.  Select the Operating System partition from the list. Do not select any other partitions.


6.  Click Edit. Ensure that the partition to be restore and how it is going to be restored is highlighted in blue. This is the target destination.


Note: If you would like the partition to be resized to fill the contents of the unused space on the drive, verify that the target destination is highlighted then click Delete Drive. The target destination with will change to unallocated space. Highlight the unallocated space. This is the new target destination.
7.  To resize, click Resize drive after recovery.
8.  The default Size value is the max amount of unallocated space. Adjust size accordingly if desired.
9.  Choose only the following options:

- Restore Original Disk Signature
10.  Click OK to return to the previous screen.
11.  If restoring to dissimilar hardware (e.g., a different machine), select the option Use Restore Anyware. A hard drive replacement does not require this option.
12.  Select the check box Reboot When Finished.
13.  Select Finish.


14.  When the restore is done, boot up should proceed normally. The boot up time may take a few minutes or a few hours, depending on the plug and play process. Do not interrupt this boot-up process.


Legacy ID


351336


Article URL http://www.symantec.com/docs/TECH129112

Terms of use for this information are found in Legal Notices